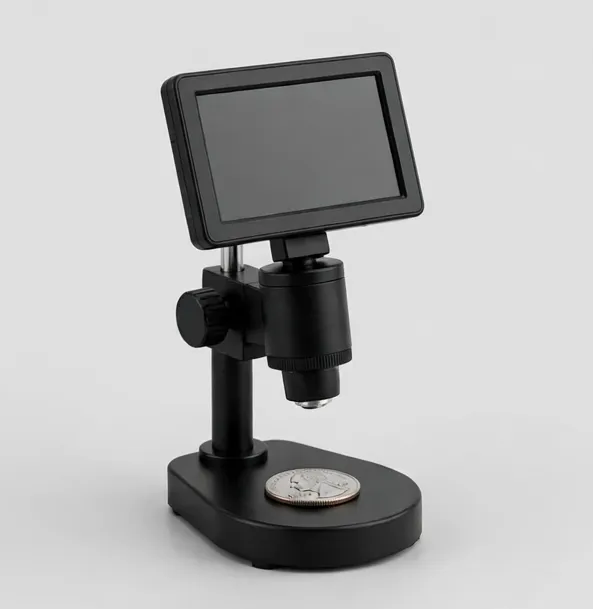
Whole-coin view on screen, with HDMI for closer die and mint-mark study
MicroHub CoinView 7" Coin Microscope
7-inch LCD10x–1300xWorking distance to 5.5 in
$119.99
Sample catalog — order confirmed by email
A microscope rewards method. Random zooming finds random details; a repeatable inspection routine finds the hairlines, doubling and die markers that decide what a coin is and what it is worth. This guide sets out the routine experienced collectors use, in order.
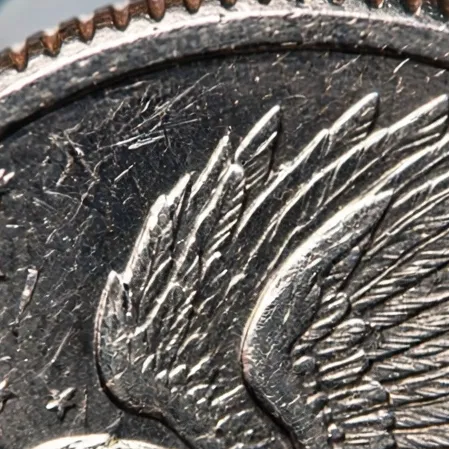
Handle the coin by its edges over a soft surface, and note the basics before magnification enters the picture: date, mint, denomination, and your first naked-eye impression of the surfaces. If you keep records — and you should — the file starts here, not after the interesting part.
Set the microscope to its lowest power with the coin centered. The first view should be the whole coin: if your instrument cannot frame it, work in overlapping sections and note that as a reason your next microscope needs a wider field.
At low magnification (roughly 5x–20x on screen), read the coin like a map. Check overall strike: are the highest points — hair, eagle feathers, lettering rims — fully formed or softly struck? Note toning patterns and whether they flow naturally across devices and fields.
Look at the fields first, then the devices. Fields show hairlines, cleaning and contact marks most honestly; devices show wear. A coin can be honest in one and troubled in the other, and the survey is where that pattern first appears.
Now make the light work. Lower the brightness and move the illumination to a low angle — side lights, or a dimmed ring light partially shaded — so light rakes across the surface. Scratches and hairlines that vanished under flat light cast tiny shadows and announce themselves.
Rotate the coin slowly through a full turn. Cleaning shows as bundles of parallel hairlines sweeping one direction; whizzing and tooling have their own tell-tale textures. This step is where problem coins are caught, and it cannot be rushed.
Raise magnification to the 20x–60x band and move to the diagnostics: mint mark shape and position, date digits for repunching, and lettering for doubling. Genuine die doubling shows rounded secondary images with split serifs; the flat, shelf-like offset of machine doubling is a different and common phenomenon that carries no variety premium.
Compare against published references for the specific issue — variety attribution is a comparison exercise. Photograph what you find at this stage; your future self, and any buyer, will want the evidence rather than your memory.
Trace the rims and the spaces between letters for die cracks: thin raised lines wandering like river tributaries. Note rim cuds (raised blobs where a piece of the die broke away) and clash marks in the fields. Die state matters to variety collectors — an early die state of a scarce variety and a terminal one are different collectibles sharing a catalog number.
Record die markers even when they are not the famous ones. Attribution of later finds often turns on a small crack you documented today.
Off the microscope, onto the scale. Weight to 0.001 g and diameter to a tenth of a millimeter, compared against the published specification for the issue, is the fastest objective screen a collector owns. Underweight pieces, wrong diameters and suspicious edges deserve deep skepticism before any money moves.
Neither this step nor the microscopy authenticates the coin — they assemble evidence. Authentication and official grading remain the work of grading services. What the routine gives you is the informed judgment to spend, pass, or submit with your eyes open.
Close the session with documentation: a whole-coin photograph at consistent lighting, close-ups of every diagnostic feature with a scale reference in frame, and the weight and diameter in the file name or record. Consistency is the whole secret — the same setup every time makes photos comparable across years and across coins.
File by the coin, not by the session. When a question arises later — at sale, at submission, at a club debate — the record answers it. Collectors who inspect this way stop buying the same lesson twice.
The bench itself deserves the same method as the inspection. A stable, low-vibration surface; the microscope at a height that lets you sit upright; light sources dimmable and positioned before the session, not improvised during it. Soft trays or a felt pad protect coins in transit across the desk, and capsules wait open for the coins you finish with.
Add the reference shelf within arm's reach: the variety references for the series you collect, a current price guide for context, and your own archive of previously inspected coins. Attribution is comparison, and comparison is fastest when the references — printed and photographic — are physically present. The scale lives on the same bench, plugged in or battery-fresh, so weighing never becomes a separate expedition that gets skipped.
Variety hunting at volume — a bag of wheat cents, a roll of quarters — needs a triage rhythm or it consumes the evening. Pass one, naked eye and low power: pull the dates and mints worth a closer look. Pass two, the diagnostic positions only: mint mark, date, the two or three letters where the famous doubling lives for that issue. Speed comes from knowing where to look, and the microscope's role is confirmation, not search.
Keep a "possibles" tray rather than deciding at the lens; second looks in fresh light overturn first impressions in both directions. Photograph the possibles the same session, while the coin is in hand, and let the archive do the arguing later. The hunters who find varieties consistently are not luckier — they are systematic, and their system looks exactly like this.
Grading submission is an economic decision the microscope informs but does not make. Submit when the coin's authenticated, graded value plausibly exceeds the raw value by more than the grading cost — typically varieties, key dates and high-grade material. The microscope's contribution is the honest pre-screen: surfaces under raking light, diagnostics confirmed, problems found at home rather than in a grading room's rejection.
Keep raw the coins whose value is in study and enjoyment, and document them just as carefully; your archive does not care whether a holder exists. And remember the boundary stated throughout this guide: the microscope and this method assemble evidence and sharpen judgment. Authentication and grades are issued by grading services — your routine's job is to make sure you submit the right coins and keep the right ones.
The first is inspecting at one magnification: zooming straight to a mint mark and never surveying the whole coin, which is where cleaning, tooling and surface verdicts live. The routine in this guide orders the views deliberately — whole coin, surfaces, diagnostics, die state — and each pass catches what the others miss.
The second is trusting a single light angle: rotate the coin, rake the light, and let every field pass through shadow once. The third is photographing without a scale or a consistent setup, which produces an archive that cannot be compared across time. And the fourth, most expensive, is cleaning a coin before inspecting it — the inspection exists to read the surfaces, and cleaning rewrites them. Method is cheap; lessons bought twice are not.
For hairlines and cleaning: one side light, low and dimmed, coin rotating slowly — the lines flash as they cross the light. For luster assessment: brighter, more frontal light, coin tilted through a small arc; genuine mint luster cartwheels, cleaned surfaces glow flatly. For toning: moderate frontal light at the white balance you use for all records, because color comparisons across sessions demand consistency.
For photography: the record setup should be boring — same height, same brightness, same angle, every coin, every session. Variety close-ups may add the raking light for drama, but the whole-coin record shot is a document, not a portrait. Collectors who standardize discover their archive becoming searchable by eye: any coin that looks wrong in the grid is wrong for a reason worth investigating.
Minute one: record the basics and center the coin at lowest power. Minutes two and three: whole-coin survey, fields then devices. Minutes four and five: raking light, full rotation, surfaces verdict. Minutes six and seven: mint mark, date, lettering — the diagnostics. Minute eight: rims and fields for die cracks, cuds and clashes. Minute nine: scale and calipers — weight and diameter against specification. Minute ten: photographs and the file entry.
Ten minutes sounds slow until you price the alternative: a problem coin bought in haste teaches the same routine at retail. Worked consistently, the routine also speeds up — the eye learns the order, the hands learn the light — until ten minutes becomes five, and the five are worth more than the hour of random zooming they replaced.
The lowest setting that frames the whole coin. Survey first, then zoom to the 20x–60x band for mint marks, dates and die details.
Raking light reveals bundles of fine parallel hairlines and an unnatural, uniform brightness. Natural circulation wear looks different: high points smooth, recesses protected.
No. It assembles strong evidence — surfaces, diagnostics, weight, diameter — for your judgment and for submissions. Authentication and official grading are grading-service functions.
Die doubling is rounded with separation and split serifs, created in the die. Machine doubling is flat and shelf-like, created at the strike. Only doubled dies carry the variety premium.
No. Cleaning damages surfaces and value, and it destroys the evidence inspection relies on. Inspect coins as they are.
Whole-coin view on screen, with HDMI for closer die and mint-mark study
$119.99
Sample catalog — order confirmed by email
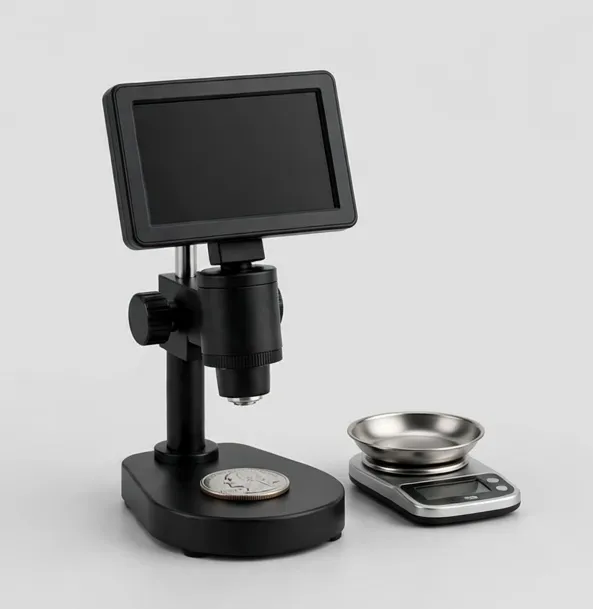
See it and weigh it: 7-inch coin microscope with a 0.001 g bench scale in the box
$129.99
Sample catalog — order confirmed by email
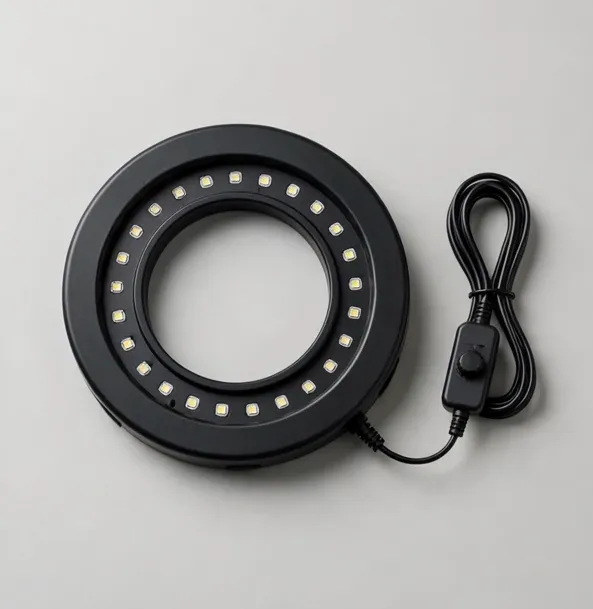
Shadow-free illumination for any microscope — 144 LEDs with a dimmer
$59.99
Sample catalog — order confirmed by email
Related categories: Coin Microscopes · LCD Screen Microscopes